
Are you interested to know how to draw smiling lips? If yes, then keep reading this post
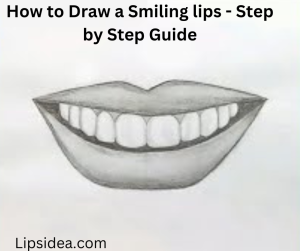
Without needing to include too many intricate features, you can design a smiling lips that looks reasonably realistic. The examples in this tutorial demonstrate how you may create a great and professional-looking drawing with essentially the bare minimum of lines and shading (even as a beginner artist).
Draw very fine lines in pencil to begin the tutorial. Once you believe that everything is in its proper place, you can trace over your lines to darken them.
You can use a pencil, paint, or even markers to complete the shading section of the instruction (as long as the markers have enough gray variants).
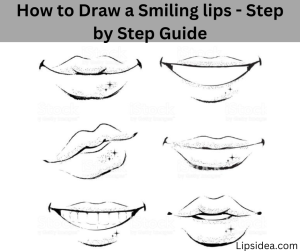
Step By Step Guide To Create Smiling Lips
Here is a step by step guide to create smiling lips.
Step 1 – Draw the GuideLines for the Smile
Start the drawing with two lines—one horizontal and one vertical. The center of your smile should be where the horizontal line crosses. Its purpose is to assist you in determining whether the width of the mouth is roughly equal in both halves.
The horizontal line should be placed at the same level as the mouth’s corners. This line is intended to assist you in ensuring that the lips are not too slanted to one side.
Step 2 – Outline the Shape of the Lips
Sketch the exterior of the mouth using the reference lines from the previous stage (as shown in the above example). Leave out any of the tiny smiling lip curves at this point. Draw their upper portion using only straight lines that resemble a “M” that has been pushed down. Draw a bottom part that is curved and then straightens out on each side until it meets the horizontal line (corners of the mouth).
This simplistic sketch was chosen as a starting point since it is simple to create and helps you to determine whether you have the desired shape quickly. If not, you can start over by erasing it.
Step 3 – Outline the Shape of the Mouth
Add the mouth’s entrance and inner lip from inside the outside design of the lips. Again, utilizing straight lines for the upper part will simplify things somewhat.
After completing this step, you can remove the horizontal guide line to prevent your drawing from becoming overly congested.
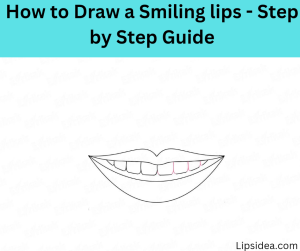
Step 4 – Outline the Combined Shape of the Teeth
Add the upper row of teeth’s outline and a glimpse of the bottom row inside the mouth.
Typically, the front teeth will be longer and the back teeth shorter. The perspective, which will make the rear teeth appear smaller, will serve to emphasize this even more.
Step 5 – Space Out the Teeth
To gauge the size of each tooth, draw some vertical dividing lines before tracing out each individual tooth.
Remember that the back teeth will appear narrower and will be partially obscured by other teeth. Additionally, the front teeth are often bigger than the neighboring pairs of teeth.
Wrapping Up
This article demonstrates how to create a smiling lips that looks fairly natural using only a basic line drawing and some basic shading. Of course, sketching many other items and various sections of the body can also be done using the same drawing techniques and principles. Create a construction drawing first, then a line drawing, and finally a shading.